| | | |
In additon and to make the sessions more comfortable, I have two sidings to let the trains pass by and three industrial spurs for spotting cars.
|
| The roadbed
I didn't give you any hints to the elevations yet. The main line starts from 1.01 m (40 inch approx.) and rises constantly with 2% in straight and 1.5% in curved areas to 1.32 m (52''). The hidden staging is at 0.92 m.
The trackbed is - the cheapest you can think of - made of 10 mm chip board with a thin cork layer. The flextracks were first soldered, then temporarily nailed down, before I glued them with the stone track ballast. Afterwards I removed the nails again.
|
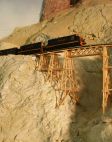
| Two GP-40s on my wooden trestle built from match sticks (my first building project)
|
Controls
The electrical part is also quite simple: the main line is divided in two halves (at the first siding). Each half is controlled by a dual cab, (following Linn Wetscott's booklet "How To Wire Your Model Railroad", printed by Kalmbach Books). Therefore I can run four trains individually, restricted to two trains per part. Each block is connected to a double pole double throw center off toggle switch.
Since four cabs need four power packs and since my financial resources were quite limited, I decided to build them by myself. The central electronic part is a LM317 IC, which is thermically controlled shortproof, controlling a voltage from 1.7 to 12 volts. These packs were very cheap and run quite well; the only setback I experienced until now, is caused by too small heatsinks. If I have a really intensive session, the metal heatsinks run quite hot, and sometimes I have to go for a beer until they have cooled off again.
| 
|
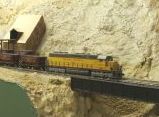
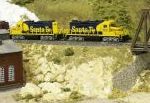
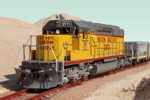
| Part of the desert landscape with a GP35 |
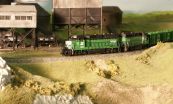
| A double headed GP 40 unit is dragging a heavy train through the coaling district
| 
|
The scenery
With open grid benchwork you have good access to the various hidden tracks in tunnels. The scenery consists of plaster hardshell, made from several layers of gypsum bandages. Only one of the bigger mountains is built by a grid of interweaving hardpaper stripes. With interesting looking rocks and liquid rubber I created some rubber molds which served for plaster rock outcroppings. Then followed a first coloring act, deciding to use a desert region on the mountaineous right side and greener and more forested hills on the left. I also sifted lots of local dirt and smaller stones, so I had plenty of real ground cover. |
Setbacks
As you can easily see in the few fotographs, I made several heavy mistakes. The flashlight reveals best that I didn't paint the rails. Furthermore, I didn't decide on a specific era; that is, in the beginning I was a fan of the steam era. That explains the wye, the turntable and some of the structures of this time. More and more the diesel locos began to find my interests, especially the much more realistic moving capabilities with modern motors and flyweels.
For several years my whole interest in railroading began to loosen, so the texturing is not completed yet and the detailing is missing totally. |
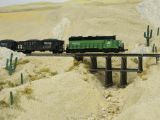
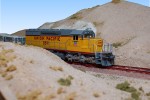
| A UP SD 45 leading an empty ore train over Devils Gulch bridge
| 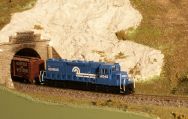 | A Conrail SD 35 is entering the yard from the west
|
| Since the latest bought locos came with accumatic couplers and most of my freights run on simple Rapido types I am planning to replace them all. Well, until now I hadn't the guts to start. Question is: what sort of couplers are needed for the different car types and the different engine bodies?
| 
| 
|
| * * * * * |
|
Lately, some friends dragged me to the HO side: I started working with a group of modelers on a quite large layout in Nunningen. With the heritage of an dismantled layout we enlarged some existing modular pieces to a closed ring of three oval tracks. At the moment we are working on two yards and an addiction of a narrow gauge part. See more at our website (opening in a new window).
In the meantime I reactivated my primitive airbrush facilities and tried to do some weathering projects. Since I'm a newbie for 100 % in this matter the results may not be a revolution at all, but for me it was a great pleasure doing these jobs. |
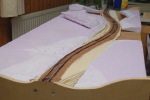
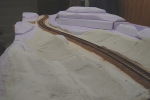
| In winter 05/06 I started work on a freelanced module the H0 fremo-US-type. It was my main interest to experience the building techniques with foam and "ground goop", the latter after an idea of Lou Sassi (Model Railroader Nov. 2005, page 48). I added more water to achieve a mixture I could apply with a soft brush. The next step will be to produce a lot of sifted real dirt of the kind used on our
farm roads. Since I used that type of ground cover on my N-gauge layout described above, I have only small amounts left. Please have a look at the results of these first steps.
|
 |
 |
 |
 |
first layers of foam plates |
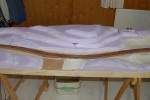
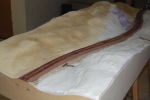
gypsum bandages are being laid |
|
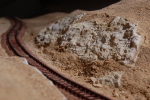
with ground goop added |
 |
 |
 |
 |
one of the rocks installed |
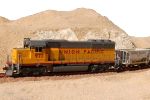
test run in undetailed scenery |
SD-40 detailed by Mario |
some details additioned |
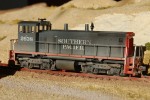 |
my first weathering job on a loco |